
Draw a Realistic Turkey Even If You’re a Beginner
A realistic turkey drawing can look complicated at first, but that is exactly what makes it so satisfying. The rounded body, small head, layered wing feathers, and dramatic fan-shaped tail give you clear features to build one at a time. You do not need any drawing experience to follow this lesson. Even if you have never used a pencil for art before, you can create a convincing turkey by working slowly and keeping your first lines light.
The method is simple: begin with rough shapes, refine the outline, add details, build shading, create feather texture, and finish with careful polishing.
For this tutorial, you will draw a side-view male turkey with its tail open. You only need a few basic materials:
- An HB pencil, which makes medium-light marks
- A 2B or 4B pencil, which makes softer, darker marks
- A regular soft eraser
- Plain drawing paper with a little surface texture
- A blending tool—a soft tool used to smooth pencil marks—such as a rolled-paper stump, folded tissue, or clean cotton swab
A kneaded eraser, which is a soft, moldable eraser, is helpful for lifting small bright areas but is not required.
Plan for about 45 to 60 minutes. You may finish sooner, or you may want extra time for the tail feathers. There is no prize for rushing. The goal is to notice simple shapes, compare their sizes, and make small improvements during each step. By the end, you will have a realistic pencil turkey and a process you can reuse when drawing other birds.
DRAW A REALISTIC TURKEY EVEN IF YOU’RE A BEGINNER IN SIX-STEPS
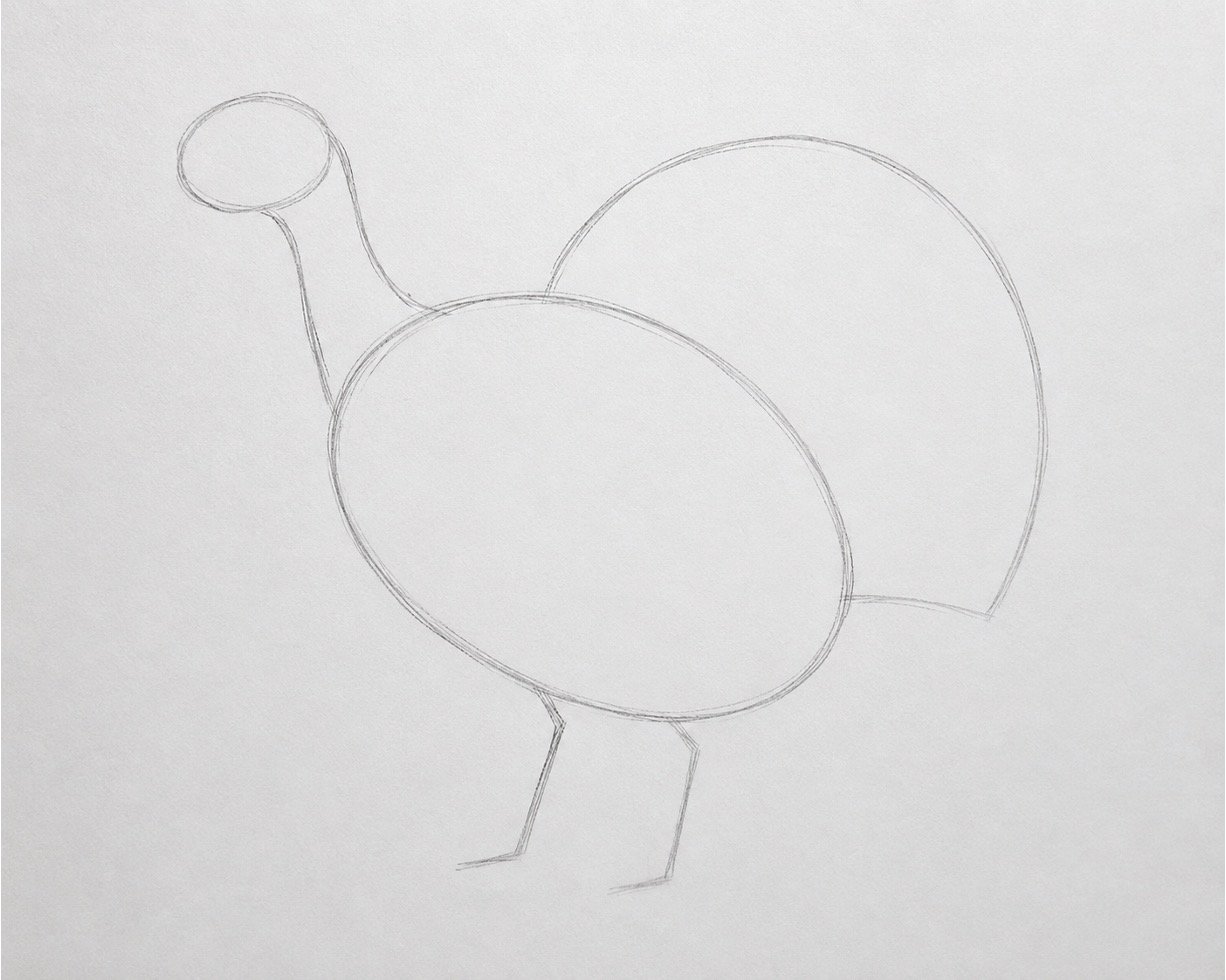
Step 1: Sketch the Basic Shapes
Goal: Build the turkey’s proportions, meaning the size relationships between its head, body, neck, tail, and legs.
Instructions: Use an HB pencil and press very lightly so your first marks will be easy to erase. Draw a large, slightly tilted oval for the body and a much smaller oval for the head. Connect them with two curved lines to form the neck. Add a wide semicircle behind the body for the open tail, then mark the legs with simple lines. Check that the head looks small compared with the body and that the tail is wider than both.
Beginner tip: Do not make the first shapes dark or perfect. Heavy lines are difficult to remove and can make you afraid to correct the drawing.
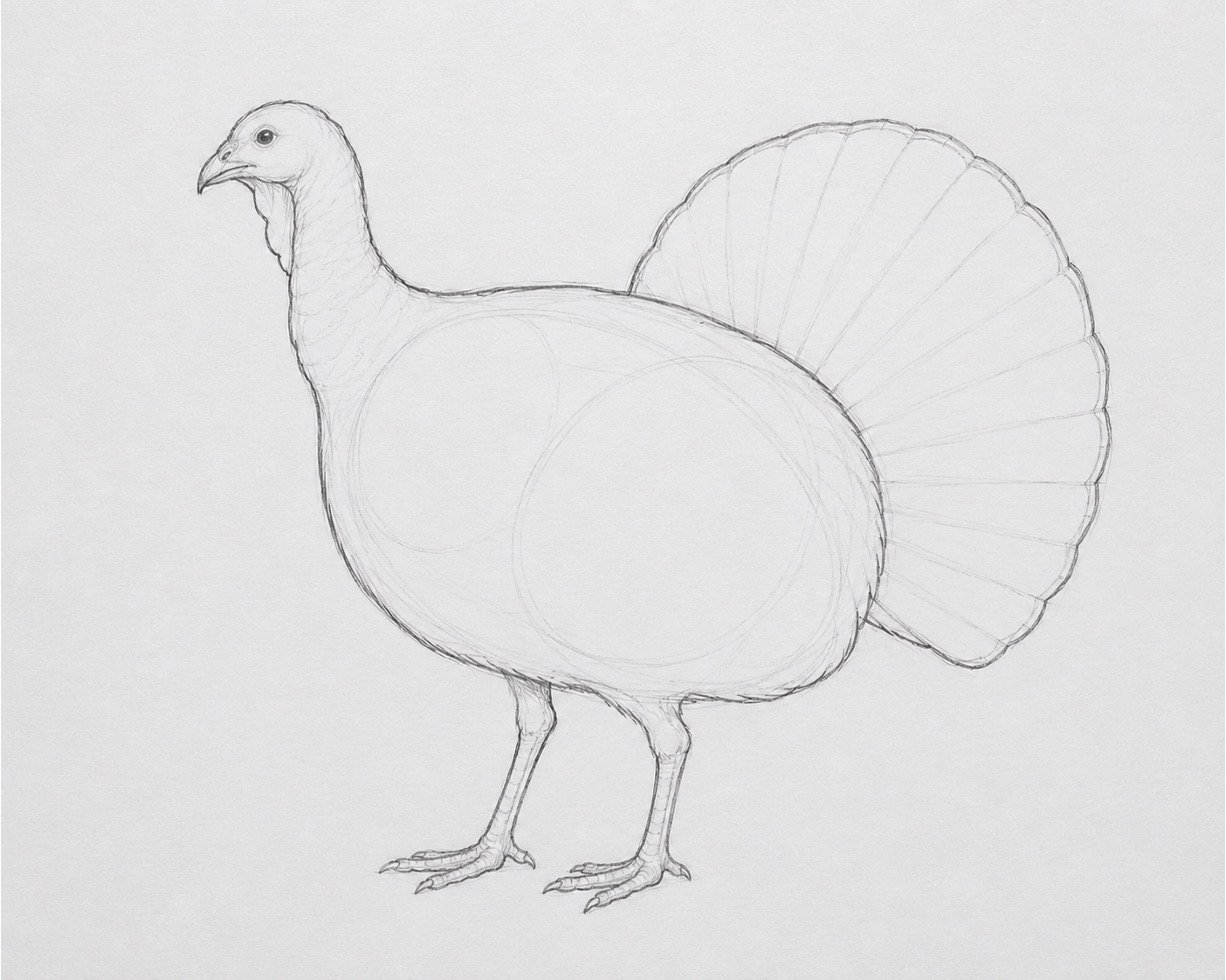
Step 2: Refine the Outline and Contour
Goal: Replace the loose shapes with a more natural contour, which is the visible outer edge of the turkey.
Instructions: Study the basic shapes and draw a smoother outer line around them with your HB pencil. Give the turkey a rounded chest, a gently sloping back, and a narrower neck leading into the head. Shape the tail into a broad fan with a slightly uneven feathered edge rather than a perfect semicircle. Add gentle bends to the legs and indicate where the feet will rest. Erase only the construction lines that you no longer need.
Beginner tip: Avoid tracing tightly around every basic shape. Use the shapes as guides, then let the final outline flow around and between them.
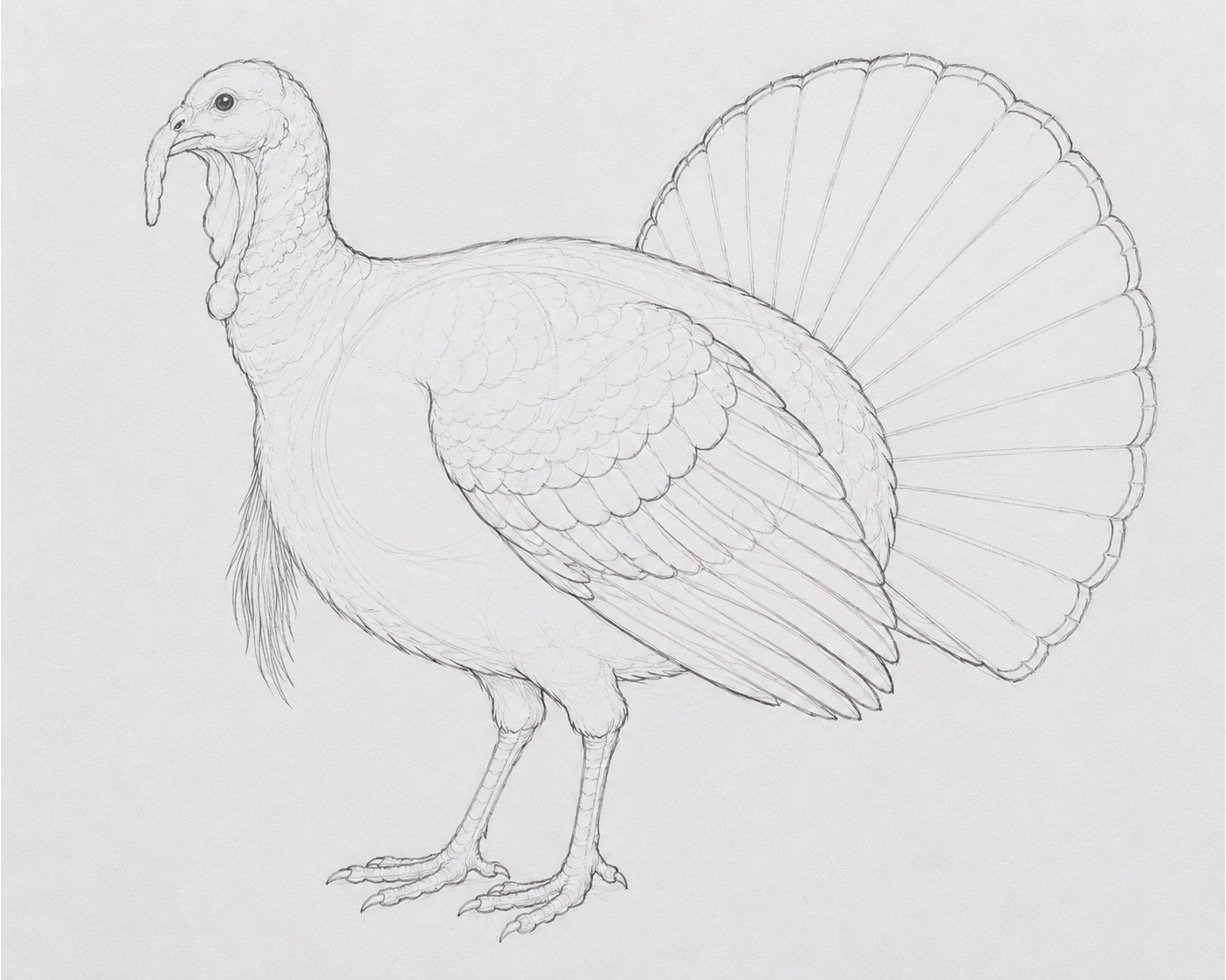
Step 3: Add the Turkey’s Structural Details
Goal: Add the recognizable body parts that make the bird clearly look like a turkey.
Instructions: Draw a small dark eye and a short, slightly curved beak. Add the snood, the soft flap that hangs over the beak, and the wattle, the loose skin hanging below the head and neck. Sketch a large folded wing on the side of the body, using overlapping curved rows to plan the feathers. Divide the tail fan into long feather sections that spread outward from behind the body. Finish with three forward-pointing toes, one smaller rear toe, and a narrow beard of hair-like feathers on the chest.
Beginner tip: A common mistake is making every detail equally large and dark. Keep the facial features small and use light marks until their positions look correct.
Step 4: Choose the Light and Add Basic Shading
Goal: Use three main values—light, mid-tone, and dark—to make the flat outline appear three-dimensional.
Instructions: Value means how light or dark an area appears. Imagine the light coming from the upper left, so the upper-left surfaces will stay lighter and the lower-right areas will become darker. Use your HB pencil with gentle pressure for the mid-tones, which are the shades between the lightest and darkest areas. Use a 2B pencil for the deepest shadows under the wing, beneath the body, behind the neck, and where feathers overlap. Add a soft ground shadow below the feet so the turkey does not appear to float.
Beginner tip: Do not shade the entire bird the same gray. Leave some paper showing in the light areas and build the dark areas gradually.
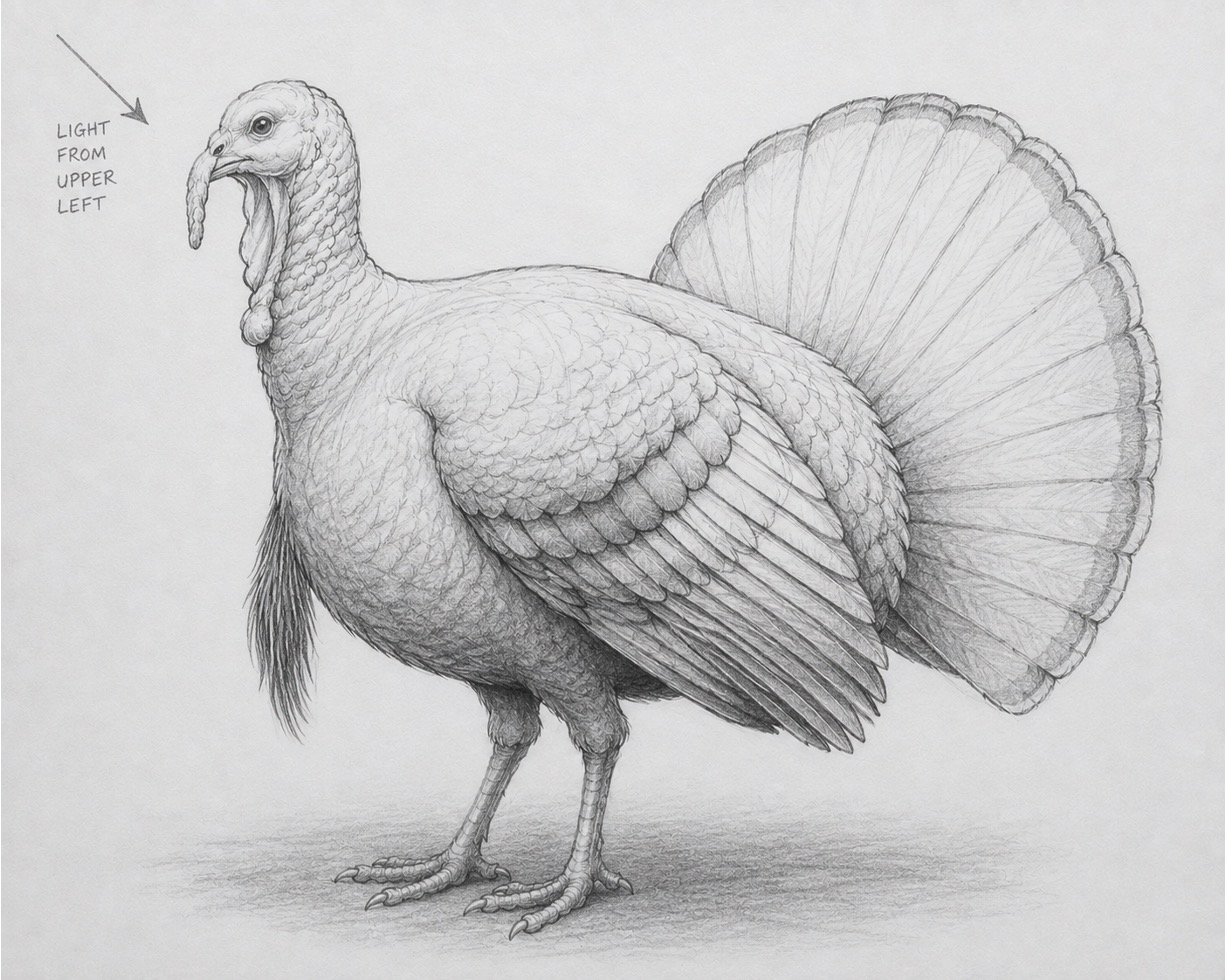
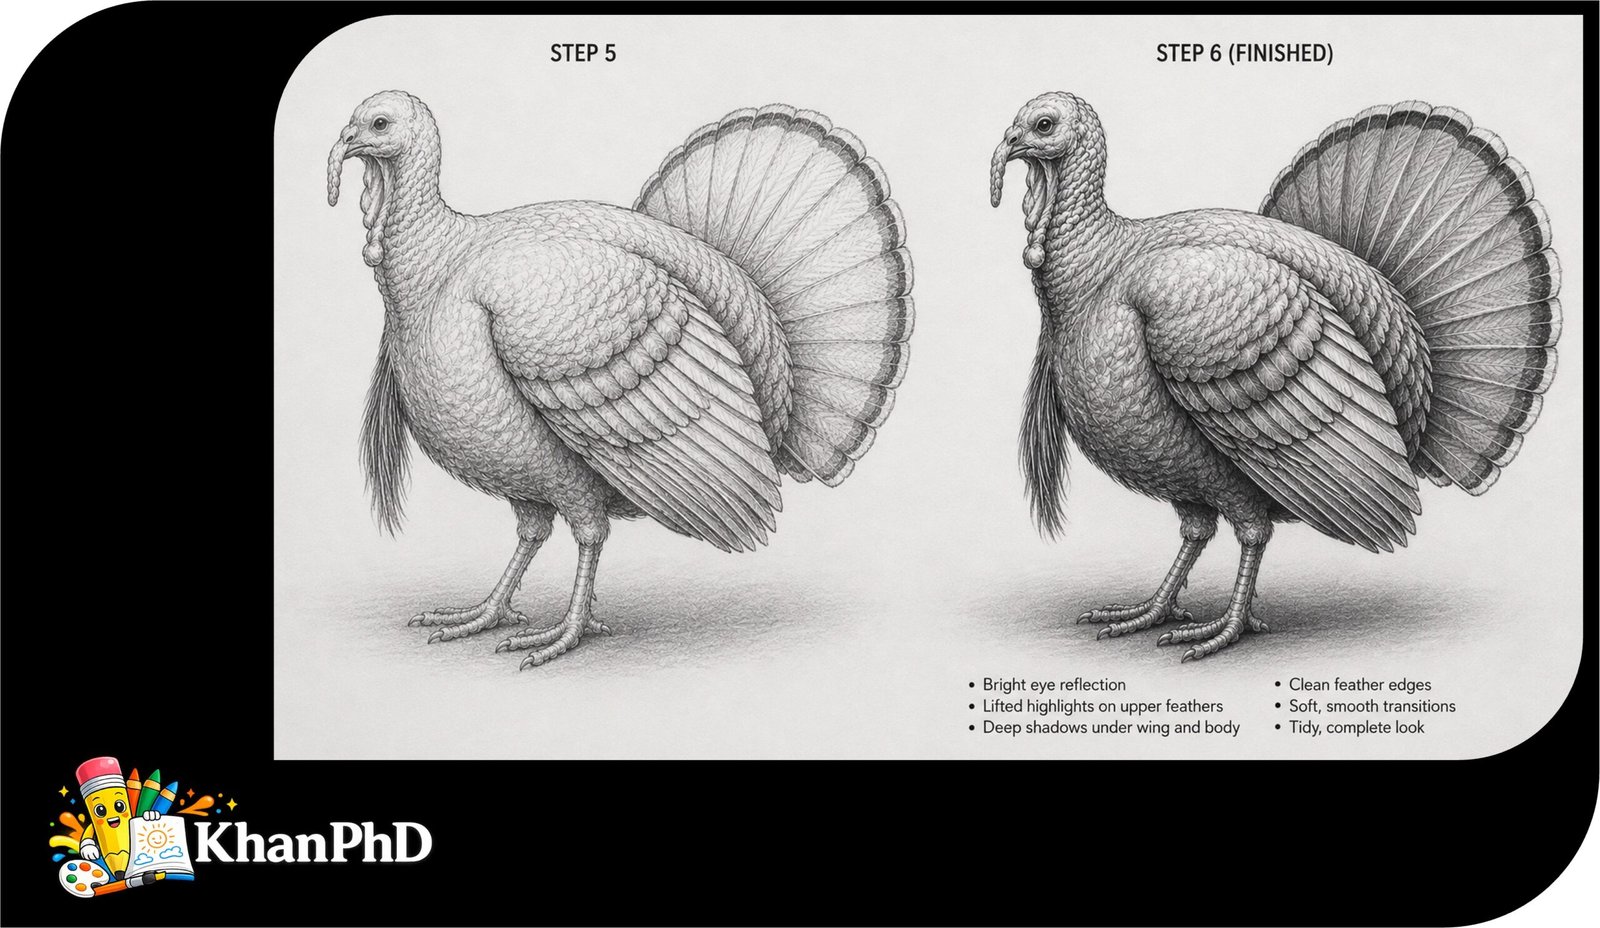
Step 5: Build Feather Texture and Fine Details
Goal: Suggest layers of feathers without drawing every feather individually.
Instructions: Use a sharpened HB or 2B pencil to add short, curved strokes that follow the round direction of the body. On the wing, create several overlapping rows of narrow feather shapes, making the lower rows slightly longer. Draw light lines along the length of the tail feathers, then darken the spaces where one feather overlaps another. Use smaller, softer marks on the neck and firmer lines on the wing and tail. Add subtle wrinkles to the wattle and a small rough texture to the legs.
Beginner tip: Do not cover the bird with random straight lines. Feather marks should curve around the body and point in the direction the feathers naturally grow.
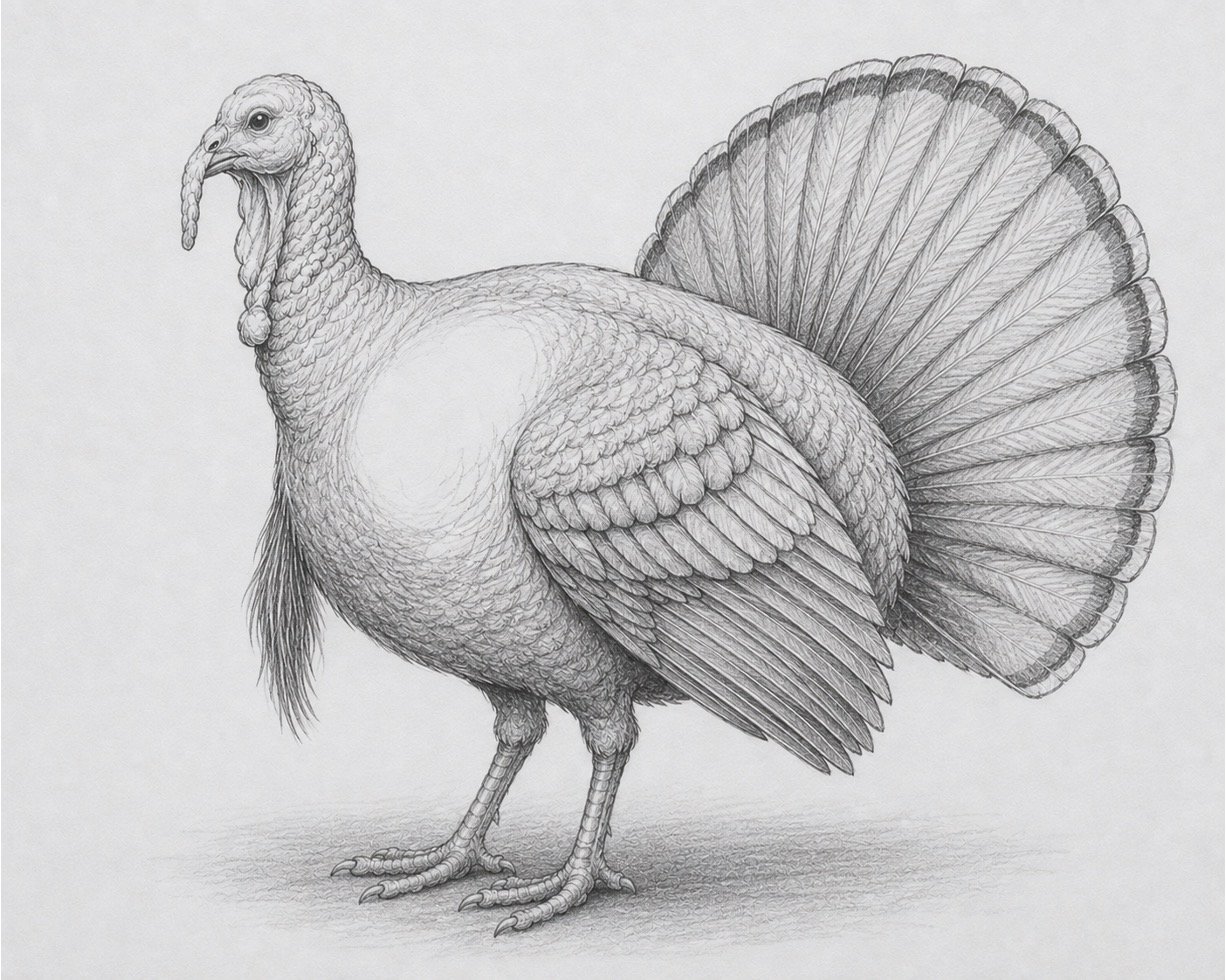
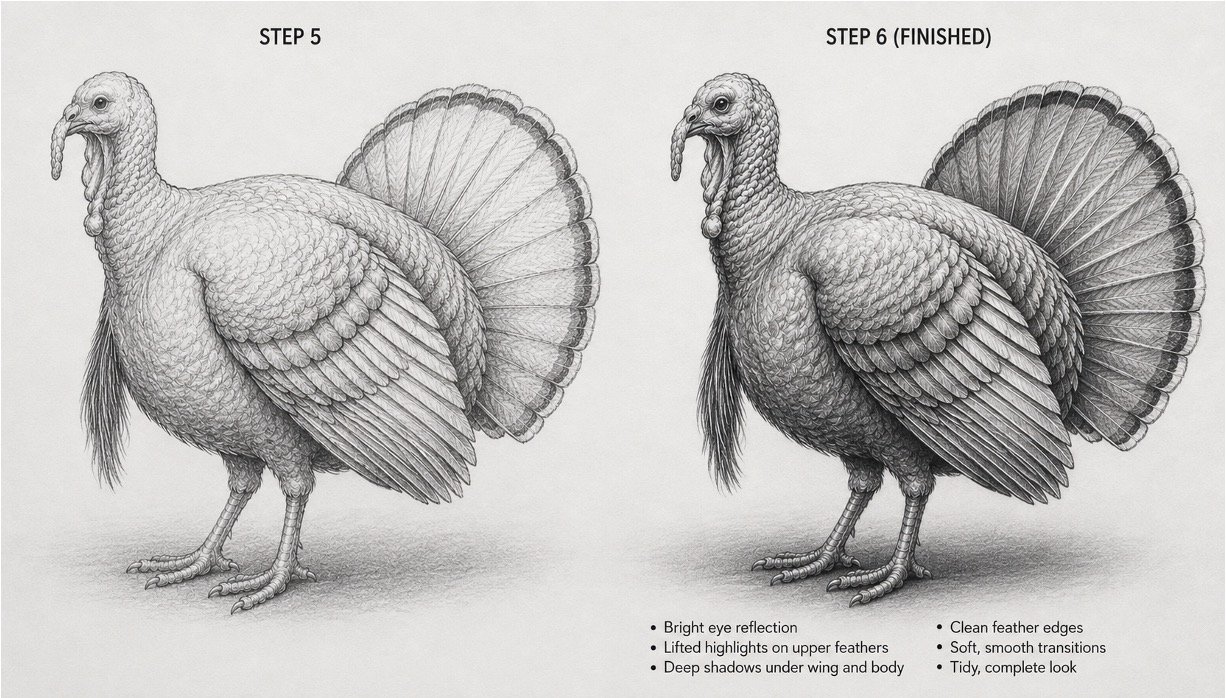
Step 6: Lift Bright Areas and Polish the Drawing
Goal: Add highlights—the brightest parts of the drawing—and soften selected areas for a clean, realistic finish.
Instructions: Gently blend broad shaded areas with folded tissue, a cotton swab, or a rolled-paper stump, but leave the feather edges clear. Use your eraser to lift narrow highlights along the top of the back, wing, neck, and selected tail feathers. Darken the eye, the space beneath the wing, and the deepest feather overlaps with a 2B or 4B pencil. Clean away smudges around the bird and strengthen only the most important parts of the outer edge. Step back from the page and stop when the light, middle, and dark areas feel balanced.
Beginner tip: Too much blending can make the turkey look blurry or made of plastic. Blend the soft shadows, but keep sharp lines around the eye, beak, feet, and important feathers.
About author










Add comment